Sunday, February 10, 2013

Fried Apples "Cracker Barrel Style"

Sometimes you just get a hankering for "comfort foods." This recipe is SUPER easy. Really, it is hard to mess up...but it is so good!

Ingredients

2 cups apple juice, 
1/2 cup apple juice 
4 large golden delicious apples, unpeeled ,cut 1/2 inch wedges
3 tablespoons cornstarch
1 teaspoon apple pie spice or (1/2 tsp cinnamon and 1/2 tsp nutmeg)
2 tablespoons sugar
1 tablespoon butter

Directions


Core and slice your apples, do not peel, unless you really want to. 


Place apples and 2 cups of apple juice in a medium sized pan


Bring to a gentle simmer and cook until fork tender. (Really watch them, it doesn't take long for them to become mushy...then you will have applesauce! Not fried apples) 

While those are cooking, in a small bowl whisk together 1/2 cup apple juice, cornstarch, sugar, and spices. Making sure the cornstarch is not clumping together. 


Once the apples are fork tender, use a slotted spoon to dish out the apples and place them in a baking dish. 

Add the spiced juice to the heated apple juice in your pan, stir constantly till it is thickened. Adding in the butter towards the end to melt and help thicken. 


After its nice and bubbly and thick, poor over apples in baking dish. 


ENJOY! 


These would be fantastic over ice-cream, pancakes, really anything! This time I only cut up 2 apples for the amount of sauce it called for and will be using the rest of the "glaze" on pork chops tomorrow. 


Sunday, January 20, 2013

Easy Sew Bibs and Burp Clothes

Earlier this month we found out we are having a little girl in June! Im ecstatic! The "nesting" bug has hit me hard. So I set out to make some practical things I can use once little Junebug gets here!

So here we go. Easy Bib for your little one!

I used a plain white terry cloth (basically towel fabric) and 100% cotton flannel. This would be a great project to recycle those old ratty towels that you just don't know what to do with. You could even use old t-shirts instead of the flannel.

BIB

Dimensions (pre-sewing)                                                               Dimensions (finished product)

12 inches long (from top of neck loop to bottom of bib)         ~              11 1/2 inches
6  1/2 inches (from bottom of neck loop to bottom of bib)      ~               6 inches
9 in wide (very bottom of bib, the top will be curved)            ~                8 1/2 inches
4 inches (circumference) for the neck hole                              ~               4 1/2 inches

Instructions:
Start off with your terry cloth. Fold your cloth in half and trace out the dimensions of the bib with a pen. I had a previous bib to trace or you can use the dimensions above and a ruler to mark off the sides. Folding it in half helps if you are free handing it. Then use your rotary cutter (or scissors) to cut along the pen marks. If its folded in half, be sure not to cut on the fold...or else you will cut your bib in half. :)


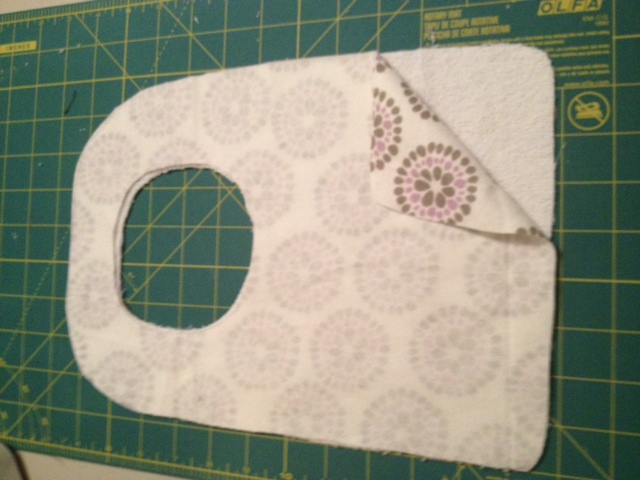
When you unfold your bib, it will look like this (below)


Next lay out your flannel or t-shirt material and place your terry cloth on the flannel. It is helpful to have your flannel, right side up so when you cut it, you are immediately ready to pin, and you do not have to re-align it. (in the picture it is wrong side up) 

Using a pen, trace around your terry cloth, or if you are brave (or lazy, like me) use your rotary blade to cut around the terry cloth. 

Next lay your two pieces right sides together. (meaning the printed side of the fabric will be against the terry cloth) 


and Pin Pin Pin! 

unless you are brave...or lazy... and decide to free hand it without pinning (not recommended). While pinning, make a mental note, or two pins, where you will stop sewing, leaving a hole. This way you can flip it right side out. 
 
Then cut a single slit to divide the two neck straps. 

Simply sew around the edges leaving a 1/4 in seem, and the hole. 

Once you flip it right side out it will look like this (below). If you have trouble getting the neck straps to flip inside out, a pen is handy. 


Then, using a zig zag stitch, sew around the entire bib, sealing up the hole and helping the fabric to lay flat. 


Finished Front


Finished Back


Then the final step is to add either velcro or snaps to the neck. Which I have yet to do... I plan to add a few snaps to the top so I can adjust the size of the neck hole as the baby grows. 

BURP CLOTHES


The Burp Clothes are essentially done the same way...minus the neck hole. 

Dimensions of Burp Cloth: (pre-sewing) 

18 inches long
11 inches wide

I know the typical burp cloth is smaller, but hey...those kids can really launch it and I'm taking NO chances. The majority of my shirt will be covered :) 

Start out the same way, folding your terry in half and measuring each side. I did a few that weren't perfectly square, but no big deal. 

Then lay your flannel on the terry, trace and cut. 

Next place your flannel right sides together and then pin pin pin!

Next stitch 1/4in around the entire thing, but leaving a hole so you can flip it right side out. DO NOT FORGET THIS! its very annoying when you do...


Flip right side out and sew all the way around, being sure to seal up the hole. Again I used the zig zag with a 1/4 in seem. 


And you have yourself an easy burp cloth! 


This was so easy and fun, and it was a great way to use up my random scraps. 


Plus they are super cute! 


Monday, December 3, 2012

Crazy and Love Struck: History of Jon and Lizzy


As many of you know, Jon and I don't have the most conventional relationship history, but I wouldn't change it for the world. Today I read through our first emails to each other and it brought back so many memories. I still get butterflies thinking about my man. Many called us crazy, and well...we were, but hey, sometimes love is a little crazy. In fact...we were flat out insane and I guarantee you if my daughter ever tries to do what we did...well, it ain't happening lol.

Now for the fun stuff :)

Skyping with Jon while it was still in Iraq
Jon and I met on match.com. YES! A DATING SITE! Now don't get all bent outta shape. Nowadays, 1 in every 6 people met their spouse online. No, I was not desperate, yes there were weirdoes that tried to hit on me, and yes...I would recommend online dating.

"Only" 6,475.05 Miles Away:
Jon was in the Army on Deployment to Iraq, and I was back home in Indiana. It wasn't easy, but it was all we knew and it was a little comforting knowing that we would have to talk in order to get to know each other...and if he was a weirdo, he was very far away. Just kidding, but in all honesty this distance is a big factor in what makes our story so unique.

Lizzy "Point A" Jon "Point B" 
A little history on the first hello...on match.com, they send you a few suggestions every day based on the things you have in common and your location. You can say yes, no, or maybe. I had been on match for a couple months and was sitting at work when I got an email with my suggestions for the day...I thumbed through them quickly looking at the profile pics, because face it, if you are not attracted to them, there is no point. (No thats not shallow, its honest) I saw this cute guy in uniform and clicked maybe, then continued on with my day...honestly I completely forgot about my "Mr. Maybe." it wasn't till I got an email from him the next day that I even looked at his profile.
I wish I still had that first email from him...but it went a little something like this. "Hi, I saw you were added to my list of interests and realized we hadn't talked." He introduced himself and then said something that gave me the impression he was looking for an extremely submissive woman. I can't for the life of me remember exactly what it said, but I do remember laughing a little bit, cause honestly, I'm stubborn...submission isn't my strong point. Long story short, I responded with an intro and a brief explanation that I wasn't the type of girl to be "bossed around, or expected to submit to everything without a good debate first." The fact that he didn't run away at that response, was a good sign that we would get along just fine.

We met on February 10, 2010 on Match, Skyped for the first time on Valentines Day 2010. Oh boy was I nervous. I went out and bought a web cam (which was horribly cheap) poor guy probably couldn't even tell what I looked like, I definitely got what I paid for. But I will never forget the first time I saw him. I just sat and stared at him, well gawked at him was more like it. I couldn't stop smiling. I don't think I said more then ten words the entire time, none of which made up a full sentence. I just sat and smiled at him while he jibber jabbered on. The next day I told him, "I promise I will start to talk more, I think I was just a little flabbergasted... You are a lot cuter than I was expecting...and I like to listen to you talk."
Lizzy (me) the first time we skyped...yes I did get up at 3a.m. (on multiple occasions) to do my hair because it was morning for him in Iraq
We talked/skyped for 114 days before we met for the first time in person.  Jon came home on leave on June 3, 2010. Meeting him for the first time at the airport felt like something out of the movies. Complete with a mid-air hug while he spun me around. I didn't want to let go, and if I had, I most definitely would have fallen over. Spinning mid-air is slightly disorienting. 
Our first picture together, little did I know, this would be the beginning of me trying to get him to take a "good" picture...unending silliness. :) 

First Kiss: WOW! Let me just say, I feel sorry for those people whose first kiss sucked. Waiting four months to see your man in person, then getting to kiss him...wow. Sparks were a-flying. (I know, I know, I'm getting all mushy gushy on ya, I told you these were facts you probably wouldn't care about.) But Im gonna share 'em anyway.
Day 2 of being together, couldn't be happier! 
3 Days later...we got married.  Not only did we get married, but it was a surprise to me. I knew we were getting married, but I didn't know any of the details...and I never would have guessed what was in store. Jon planned it all. It was wonderful. We got up early that monday morning, drove to Noblesville, climbed in a hot-air balloon, and said "I Do" at 1500 ft. right at sunrise. It was beautiful. By far, the best day of my life. 


Wedding Day after landing


Jon Never Proposed...well not officially.  Technically he asked me if I wanted to marry him the first time we skyped, I just laughed and smiled and said "sure!" Then, I was only half kidding. Two weeks after meeting on match, the subject came up again, and I knew, I wouldn't turn him down. I would seriously marry this man I hardly knew, but had already grown to love. I got the ring the day before we got married, a friend of my dads made it for us and it is perfect! I love it! Someday, maybe ill get him to get me a matching wedding band, cause frankly, we didn't have an engagement, so the engagement ring became The Ring. At the time there was no need for two rings, but now, people think I'm still engaged, and well, with a baby on the way, I want people to know Im "bought n paid for" lol. 
Getting ready to say goodbye after two wonderful weeks 
Deployment after 2 weeks of marriage. Yup, he had to go back to Iraq, we got married, had two wonderful weeks together, then he had to leave again.  Seriously, our life could be a movie...or a really good book. We knew it would be that way, we knew that he would come home for a 2 week leave, then have to return to Iraq for four more months. I knew it would be hard, but I didn't realize how quickly those two weeks would fly by. In a way, it seems like they drug on forever, but at the same time, they would never be long enough. Saying goodbye to him at the airport that day felt like my heart was being ripped out of my chest. We had waited four months to see each other and hold each other and now we would have to do it all over again. Only this time, we would know what it was like to actually be together in person. 

Recap: So, In case you missed it, we only knew each other for 4 months before we got married, and we had only spent 3 days together in person before we got married. Crazy? ...Yes. Would I change a single thing?....most definitely not. We are not your perfect couple. We have our problems but somehow we work it out. Some things are just meant to be. 

Update: We have been married 2 1/2 years. Jon is now out of the military and working as a software engineer on a particle accelerator. HOW COOL! I'm a stay at home wife, learning to keep my sanity while spending most hours at home...and Our first child is due in June, only 7 more months! Life is amazing...and the fun part...Our story has just begun. 


Check out Part II of our love story here!

Tuesday, November 20, 2012

Gluten Free Hawaiian Rolls


Ingredients

  • 3 1/2 cups Bob's Red Mill's All Purpose Gluten Free Flour
  • 2 eggs (* or 2 Ener-G Egg replacer made according to package)
  • 1 cup pineapple juice
  • 1 cup water
  • 3/4 cup sugar
  • 1/4 tsp ginger
  • 1/2 tsp vanilla
  • 1 package yeast proofed or 2 1/4 tsp of active dry yeast proofed
  • 4 Tbsp margarine, melted (*or dairy free margarine)

Directions

In your kitchen aid mixer bowl, add pineapple juice, water, sugar, ginger, vanilla, melted margarine, and egg 


Start proofing your yeast

Add flour to mixture and blend until mixed. will be slightly runny

Add in yeast.  

Beat on high speed for 3 minutes.

If it is still runny Add in flour little by little till you get a dough consistency. 

Using a greased 1/2 cup, scoop out dough and place in baking dish or cast iron pan. 

Cover with loosely fitting saran wrap and place in a warmed oven.

Let rise for an hour


Preheat oven to 350'F 

Cover bread with foil and bake for 15 minutes

Remove foil and bake for another 15-20 minutes.


ENJOY! 

Recipe was taken and modified from: raisingallergykids


Friday, November 2, 2012

Gluten Free Egg Rolls

I have been craving these the last few weeks, and decided to give it a go. I looked everywhere and could not find a ready-made wonton wrapper. Surprisingly they are very easy to make yourself. Even making them gluten free is a piece of cake! Depending on how long you want it to take to prepare your food, it helps to have an extra person to keep things moving... Since you have to do the wrappers and filling, luckily I was able to recruit the hubby to do the filling.

Start by cooking your meat in a large skillet. I bought the pre-cut beef (used for stews) in the meat section. You could use chicken or even go meatless.

Now, start on your Wonton Wrappers recipe. The key to these wrappers is the egg whites. When it comes to gluten free cooking, egg whites really hold it all together and keep it from getting dry and flakey.


Ingredients
  • 1 cup high-quality all-purpose gluten-free flour or bread mix. 
  • ½ teaspoon xanthan gum (omit if your blend already contains it)
  • 1 extra-large egg and 1 extra-large egg white, beaten together
  • 2 to 4 tablespoons warm water

Instructions
  1. In a medium-size bowl, combine the flour and xanthan gum. Add the eggs (one whole egg and one egg white) and 2 tablespoons water to the flour mixture and beat together to combine.
  2. Press the mixture together with wet hands. It should stick together when pressed, and should have a smooth but stiff consistency. Add more water a tablespoon at a time until it reaches the proper consistency. If your dough is slimy texture, add more flour and less water next time. 
  3. Separate the dough into two disks. Sprinkle each disk with more flour, and knead it in to form a smooth dough. Roll out the first disk a bit on a floured surface. Sprinkle again with flour, and roll a bit more. Keep sprinkling and rolling until the dough is no more than ⅛ inch thick. Slice into desired shapes with a sharp knife or pastry cutter (pizza cutter works fine too). Repeat with the other disk of dough. For the wrappers, they should be about 4inches square, on the larger side, and when you think they are thin enough, keep rolling they should be paper thin, but just thick enough to stay together. If too thick, they will not fry all of the way through and they will have a pie crust consistency. Like the pies you would get at McDonalds. :) We want crunchy egg rolls. 
  4. When you’re using the wrappers, moisten the edges with a bit of warm water to help them stick together when cinched closed.

I did not have a general all-purpose flour, but I did have a red mills bread mix available that worked great! I also found that if you use this recipe and double it a couple of times, it makes amazing pie crust!

Ones your wrappers are ready, set them aside and start on your filler. The recipe calls for cabbage and shaved carrots, but I saved some time by buying ready made slaw mix. dry. Just the veggies pre-shredded.  

Ingredients
  • 6 tablespoons tamari (or more to taste)
  • 2 tablespoons rice vinegar (or more to taste)
  • 2 tablespoons honey (or more to taste)
  • 3 tablespoons cornstarch, 
  • 1 pound 90% lean ground and chopped beef
  • 2 tablespoons sesame oil or coconut oil
  • 4 cloves garlic
  • 10 ounces shredded cabbage (I used preshredded slaw)
  • 2 large carrots, peeled and grated
  • Freshly ground black pepper, to taste
  • Gluten-free Wonton Wrappers 
  • oil, for frying
Instructions
  1. In a large bowl, place the tamari, rice vinegar, honey and 2 tablespoons cornstarch, and whisk to combine well. Pour half the sauce into a separate, small bowl. To the remaining sauce in the large bowl, add the ground meat, and mix to combine. Allow to sit at room temperature for a few minutes to allow the beef to absorb the sauce.
  2. In a large skillet, cook the garlic in the sesame oil over medium high heat until the garlic becomes fragrant (about 2 minutes). Add the cabbage and carrots, and then the sauce you set aside from earlier, and toss to combine. Turn the heat down to medium-low, cover the skillet and cook, tossing occasionally, until the cabbage is wilted and the carrots are beginning to soften (about 5 minutes). Uncover the skillet, add the beef mixture and the remaining tablespoon cornstarch, and toss to combine. Allow the mixture to cool for about 10 minutes. Tilt the skillet to separate any remaining liquid, and pour off the liquid.
  3. Arrange the first wonton wrapper square with a corner facing you. Place a bit of filling about 1 inch from the corner of the wrapper. Fold over the corner and roll one turn away from yourself (see photo), making sure to roll as tightly as possible and to prevent any trapped air bubbles. Fold in the sides securely, and continue to roll until the eggroll is completely sealed. Repeat with the remaining wrappers and filling.
  4. Fry, about 1 minute per side, in 375 degrees F oil. Drain on paper towels and keep in a 200 degree F oven until ready to serve.
  5. Serve the remaining filling tossed with rice noodles


Gluten Free Dark Chocolate and Peanut Butter Cheesecake

Okay, 8 weeks pregnant and everyone I know is posting about cheesecake, not good. Pinterest is seriously killing me and I just couldn't take it anymore. Sadly, the days of going to the store and buying cheesecake are long over. It has now been almost 7 months of eating gluten free, and at this point...there is no going back. :) So goal this week, was to discover a great Gluten Free Cheesecake. There is the option to buy it in the store, but cheesecake is expensive enough without it being gluten free. I found a recipe for a basic New York Cheesecake online, but whats cheesecake without chocolate?!? So, I changed it up a bit.

This is the easiest recipe I could possibly find when it comes to cheesecake, I wasn't about to go all out and use the 20 ingredients required on other recipes. Just a little out of our budget...which I have already manage to blow. Next time, Maybe...Anyway, on to yummy chocolate cheesecake.

Recipe: Yields 8-12 servings

Crust:
2 cups of crushed pecans
2/3 cup of softened butter (NOT MELTED) 
3/4 cup brown sugar
2 cups coconut flour

Filling: 
4 – 8 oz bars of gluten free cream cheese, softened
1 cup of granulated sugar
2 eggs
¼ teaspoon salt
1 teaspoon gluten free vanilla

1/2 cup dark chocolate chips
1/2 cup peanut butter chips

Preheat oven to 350' F

Start with the crust.

I bought a bag of pecans, while still in the bag, cut a tiny slit at the top just to let the air out. Use a hammer or something with a flat end to crush the pecans. Now there may be an easier way to do this, but this method worked fine. Put crushed pecans in bowl. Add butter, brown sugar and flour. Using your hands kneed the mixture till it becomes slightly crumbly but will hold its form. Lightly spray your 9" pan. Then using your hands spread the crust mixture on bottom of pan and up the sides. Making it 1/4 inch thick. I then added a handful of dark chocolate chips. Set aside while you make the filling. 

DISCLAIMER: I tried baking the crust for a few minutes before adding the filling...didn't work too well, the butter melted and the sides fell down. If this happens throw it in the freezer then reform the sides. But the chocolate at the bottom melted nicely. 


Now for the filling. Having a kitchen aid mixer is a lifesaver! Add cream cheese, softened, sugar, eggs, salt and vanilla and mix well. It shouldn't be runny, the batter should hold its form but be soft enough to manage. Melt chocolate chips and peanut butter in microwave and add to filling. 

After mixing it all together use a spatula to pour into pan being sure to avoid the sides at first so your crust doesn't get mixed in with the batter. Sprinkle any extra pecans over top and put in oven for 30-45 minutes. 


Make sure the filling is cooked thoroughly by sticking a knife in the center. It should come out clean. Using a spatula go around the outside edges of the cake to loosen sides from pan. 


Let cool, do not take the sides off your pan until it is completely cooled. Top with extra Chocolate Chips and Peanut Butter Chips, throw in fridge overnight preferably, and enjoy!  :)